

How To Change Brush Presets In Krita
Loading and Saving Brushes
In the real world, when painting or drawing, you don't but use one tool. Y'all use pencils, erasers, paintbrushes, dissimilar types of paint, inks, crayons, etc. All these accept different means of making marks.
In a digital program similar Krita yous accept something similar. We telephone call this a brush engine. And much similar how cars have different engines that requite different feels when driving, or how pencils make distinctly dissimilar marks than roller ball pens, different brush engines have totally dissimilar feels.
The castor engines have a lot of dissimilar settings as well. So, you can save those settings into presets.
Unlike Photoshop, Krita makes a departure between brush-tips and castor-presets. Tips are only a stamp of sorts, while the preset uses a tip and many other settings to create the total brush.
The Brush settings drop-down
To starting time, the Brush Settings Editor console tin be accessed in the toolbar, between the Choose brush preset push button on the right and the Fill Patterns button on the left. Alternately, you tin use the F5 key to open it.
When you open Brush Settings Editor panel you lot will come across something like this:
Tour of the brush settings driblet-downward

The brush settings drop-down is divided into six areas,
Section A – Full general Information
This contains the Preset Icon, Live Castor Preview, the Preset Name, the Engine name, and several buttons for saving, renaming, and reloading.
Krita's castor settings are stored into the metadata of a 200×200 PNG (the KPP file), where the epitome in the PNG file becomes the preset icon. This icon is used everywhere in Krita, and is useful for differentiating brushes in ways that the live preview cannot.
The live preview shows a stroke of the current brush as a little southward-curve wiggle, with the pressure being non-existent on the left, and increasing to total pressure level as it goes to the correct. Information technology tin thus show the effect of the Pressure level, Drawing Angle, Distance, Fade and Fuzzy Dab sensors, but none of the others. For some brush engines information technology cannot show annihilation. For the colour smudge, filter brush and clone tool, it shows an alternating line blueprint because these castor engines utilize the pixels already on canvas to modify their effect.
After the preset name, there's a push button for renaming the castor. This will salve the brush as a new castor and deactivate the previous brush.
Engine
The engine of a castor is the underlying programming that generates the stroke from a brush. What that means is that different brush engines accept unlike options and different results. You can see this every bit the difference betwixt using crayons, pencils and inks, simply considering computers are math devices, most of our brush engines produce different things in a more than mathematical fashion.
For most artists the mathematical nature doesn't affair as much as the dissimilar textures and marks each brush engine, and each brush engine has its own distinct flavor and use, and can be further customized by modifying the options.
Reloading
If you alter a preset, an icon will appear backside the engine name. This is the Reload the brush preset push. You can apply it to revert to the original brush settings.
Saving a preset
On the right, in that location'south Save New Castor Preset… and Overwrite Brush buttons.
- Save New Brush Preset…
-
Volition accept the current preset and all its changes and save information technology equally a new preset. If no change was made, you will be making a copy of the current preset.
- Overwrite Brush
-
This will but enable if there are any changes. Pressing this will override the electric current preset with the new settings, keeping the name and the icon intact. It will always make a timestamped back up in the resources folder.
Salve new preset will call up the following window, with a mini scratch pad, and all sorts of options to change the preset icon:
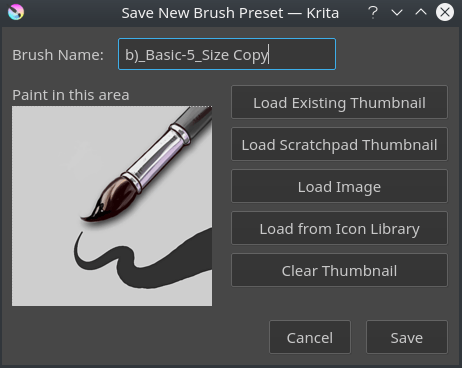
The epitome on the left is a mini scratch pad, you can draw on it with the current brush, assuasive pocket-size modifications on the wing.
- Brush Proper noun:
-
The Name of your brush. This is also used for the
KPPfile. If there's already a brush with that proper name, it will effectively overwrite it. - Load Existing Thumbnail
-
This will load the existing thumbnail inside the preset.
- Load Scratch Pad Thumbnail
-
This volition load the dashed area from the large scratch pad (Section C) into the thumbnail area.
- Load Image
-
With this yous tin can choose an image from disk to load as a thumbnail.
- Load from Icon Library
-
This opens up the icon library.
- Clear Thumbnail
-
This will make the mini scratch pad white.
The Icon Library
To make making presets icons faster, Krita got an icon library.
Information technology allows y'all to select tool icons, and an optional small-scale emblem. When you printing OK it will load the resulting combination into the mini scratch pad, and you lot can draw in the stroke.
If you get to your resources folder, at that place's a binder there called preset\_icons , and in this folder at that place are tool\_icons and emblem\_icons . You tin add semi-transparent PNGs hither and Krita will load those into the icon library equally well, so you can customize your icons even more than!
At the meridian right of the icon library, there are three sliders. They allow you lot to adjust the tool icon. The elevation two are the aforementioned Hue and Saturation as in HSL adjustment, and the lowest slider is a super simple levels filter. This is done this fashion because the levels filter allows maintaining the darkest shadows and brightest highlights on a tool icon, making it much better for quick adjustments.
If you're done with everything, you tin press Save in the Save New Brush Preset dialog and Krita volition salve the new castor.
Section B – The Preset Chooser
The preset chooser is much the same as the preset docker and the preset drop-down on the F6 fundamental. It'southward unique in that it allows you lot to filter by engine and this is also where you can create brushes for an engine from scratch.
Information technology is by default collapsed, so you will need to press the pointer at the top left of the brush engine to show it.
The tiptop drop-downward is set up to "all" by default, which means it shows all engines. It so shows a tag section where you can select the tags, the preset list and the search bar.
Underneath that there's a plus icon, which when pressed gives yous the total list of Krita's engines. Selecting an engine from the list volition show the brushes for that engine.
The trashcan icon does the aforementioned as it does in the preset docker: delete, or rather, deactivate a preset, and then it won't evidence up in the list.
Department C – The Scratch pad
When you tweak your brushes, you want to be able to bank check what each setting does. That's why, to the correct of the settings drop-down, there is a scratch pad.
It is by default complanate, so yous will take to printing the pointer at the top right of the castor settings to show it.
When saving a new preset, you tin cull to go the icon from the scratch pad, this volition load the dash area into the mini scratch pad of the Salvage New Brush Preset dialog.
The scratch pad has five buttons underneath information technology. These are in society for:
-
Make full area with brush preset icon
-
Fill expanse with current image
-
Fill area with gradient (useful for smudge brushes)
-
Fill area with background color
-
Reset area to white
Section D – The Options List
The options, every bit stated above, are dissimilar per brush engine. These represent the unlike parameters, toggles and knobs that you can plough to make a brush preset unique. For a couple of options, the main things to change are sliders and checkboxes, but for a lot of them, they use curves instead.
Some options tin exist toggled, every bit noted by the footling checkboxes next to them, but others, similar flow and opacity are and then fundamental to how the brush works, that they are always on.
The niggling padlock icon next to the options is for locking the castor. This has its own folio.
Department E – Option Configuration Widget
Where section D is the list of options, section E is the widget where you can change things.
Using sensor curves
One of the big of import things that brand art unique to the artist who created information technology is the style of the strokes. Strokes are dissimilar because they differ in speed, rotation, direction, and the amount of pressure put onto the stylus. Because these are so important, we would want to customize how these values are understood in detail. The all-time manner to do this is to use curves.
Curves evidence up with the size widget for example. With an inking brush, we want to have size mapped to pressure. Merely toggling the size selection in the option list volition do that.
However, different people accept different wrists and thus will press differently on their stylus. Someone who presses softly tends to discover it easy to make thin strokes, but very hard to make thick strokes. Conversely, someone who presses hard on their stylus naturally volition have a difficult time making thin strokes, only easily makes thick ones.
Such a state of affairs can be improved by using the curves to map pressure to output thinner lines or thicker ones.
The brush settings curves even have quick curve buttons for these at the superlative. Someone who has a hard fourth dimension making small strokes should try the second to concluding concave button, while someone who has a difficult fourth dimension making thick strokes should effort the tertiary button, the Southward shape.
Underneath the bend widget in that location are 2 more than options:
- Share bend across all settings
-
This is for the list of sensors. Toggling this will make all the sensors employ the same curve. Unchecked, all checked sensors will have divide curves.
- Curves calculation mode:
-
This indicates how the multiple values of the sensor curves are used. The curves always go from 0 to 1.0, so if one bend outputs 0.v and the other 0.7, then…
- Multiply
-
Volition multiply the two values, 0.5*0.7 = 0.35.
- Addition
-
Volition add the two to a maximum of one.0, and so 0.5+0.vii = 1.ii, which is and so capped at 1.0.
- Maximum
-
Will compare the two and option the largest. And then in the case of 0.5 and 0.7, the result is 0.7.
- Minimum
-
Will compare the 2 and choice the smallest. So in the case of 0.5 and 0.7, the event is 0.5.
- Difference
-
Will subtract the smallest value from the largest, so 0.7-0.5 = 0.2.
Information technology'due south perhaps improve to see with the post-obit example:
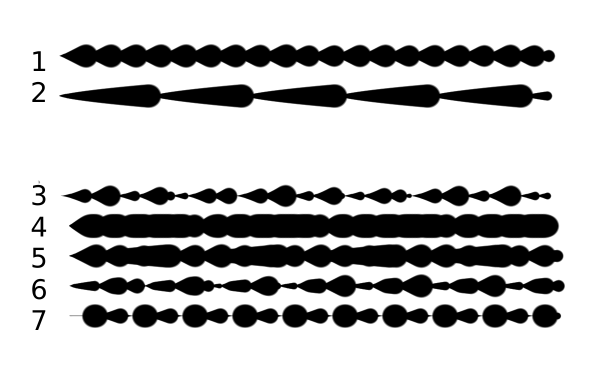
The first ii are regular, the rest with different multiplication types.
-
Is a brush with size ready to the distance sensor.
-
Is a castor with the size set to the fade sensor.
-
The size is calculated from the fade and distance sensors multiplied.
-
The size is calculated from the fade and distance sensors added to each other. Observe how thick it is.
-
The size takes the maximum value from the values of the fade and distance sensors.
-
The size takes the minimum value from the values of the fade and distance sensors.
-
The size is calculated by having the largest of the values subtracted with the smallest of the values.
Section F – Miscellaneous options
- Eraser switch size
-
This switches the brush to a separately stored size when using the Eastward fundamental.
- Eraser switch opacity
-
Aforementioned as above, merely then with Eraser opacity.
- Temporarily salvage tweaks to preset
-
This enables muddy presets. Muddied presets store the tweaks y'all make as long as this session of Krita is agile. After that, they revert to default. Dirtied presets tin can be recognized by the icon in the top-left of the preset.
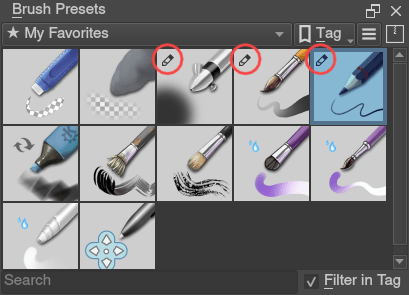
The icon encircled in cherry in the top left of the third, 4th and 5th presets in first row indicate it is "Dirty", meaning there are tweaks made to the preset.
- Instant preview
-
This allows you lot to toggle instant preview on the brush. The Instant Preview has a super-secret feature: when you press the instant preview label, and and then correct click it, it will testify a threshold slider. This slider determines at what brush size instant preview is activated for the brush. This is useful because pocket-size brushes tin can be slower with instant preview, and so the threshold ensures it only activates when necessary.
The On-canvass brush settings
There is a On-Canvass Brush Editor. If you open up up the pop-up palette, there should be an icon on the bottom-right. Press that to testify the on-canvas brush settings. Yous will see several sliders here, to quickly make pocket-size changes.
At the height it shows the currently agile preset. Next to that is a settings button, click that to become a list of settings that can be shown and organized for the given brush engine. You tin can use the up and downwards arrows to order their position, and and so left and right arrows to add or remove from the list. You can also drag and drop.
Making a Brush Preset
Now, let'southward make a uncomplicated castor to test the waters with:
Getting a default for the brush engine.
Commencement, open the settings with the F5 key.
And then, press the arrow on the upper left to open the preset chooser. There, press the "+" icon to get a list of engines. For this brush we're going to make a pixel brush.
Example: Making an inking brush
-
Depict on the scratch pad to encounter what the current castor looks like. If done correctly, you should have a 5px broad brush that has pressure set to opacity.
-
Let u.s.a. turn off the opacity first. Click on the opacity option in the right-hand listing. The settings should now exist inverse to a big bend. This is the sensor bend.
-
Uncheck the Enable Pen Settings checkbox.
-
Examination on the scratch pad… there even so seems to exist something affecting opacity. This is due to the menses option.
-
Select the Catamenia selection from the list on the correct hand. Catamenia is similar Opacity, except that Flow is per dab, and opacity is per stroke.
-
Uncheck the Enable Pen Settings checkbox here likewise. Test again.
-
At present you should be getting somewhere towards an inking castor. It is still too small still, and kinda grainy looking. Click Brush Tip in the brush engine options.
-
Here, the bore is the size of the brush-tip. Y'all can affect the slider change the size, or right-click information technology and blazon in a value. Set information technology to 25 and test again. It should be much meliorate.
-
Now to make the brush experience a bit softer, turn down the fade parameter to nigh 0.ix. This'll give the brush mask a softer edge.
-
If you test once again, you'll discover the fade doesn't seem to take much effect. This has to exercise with the spacing of the dabs: The closer they are together, the harder the line is. Past default, this is 0.1, which is a fleck low. If you gear up it to 10 and test, you'll see what kind of result spacing has. The Motorcar checkbox changes the manner the spacing is calculated, and Auto Spacing with a value of 0.8 is the best value for inking brushes. Don't forget that you tin apply right-click to type in a value.
-
Now, when you test, the fade seems to have a normal effect… except on the really small sizes, which look jagged. To get rid of that, cheque the anti-aliasing check box. If you examination again, the lines should be much nicer now.
Saving the new Brush
When you're satisfied, get to the upper left and select Salvage New Castor Preset… button.
You lot will get the save preset dialog. Proper noun the brush something similar "My Preset". Then, select Load from Icon Library to go the icon library. Choose a nice tool icon and press OK.
The icon volition exist loaded into the mini scratch pad on the left. Now doodle a nice stroke next to it. If you feel y'all messed up, just become back to the icon library to load a new icon.
Finally, printing Save, and your castor should be done.
You tin further modify your inking brush by…
- Changing the amount of pressure you need to put on a brush to arrive full size.
-
To practice this, select the size option, and press the pressure sensor from the list next to the curve. The curve should look similar a straight line. Now if you lot want a brush that gets big with little force per unit area, tick on the curve to make a betoken, and elevate the point to the upper-left. The more the point is to the upper-left, the more farthermost the effect. If you want instead a castor that yous have to press really hard on to become to total size, drag the dot to the lower-right. Such a brush is useful for fine details. Don't forget to save the changes to your brush when done.
- Making the fine lines look even softer by using the flow option.
-
To do this, select the flow option, and turn back on the Enable Pen Settings check box. Now if you examination this, information technology is indeed a bit softer, but maybe a fleck likewise much. Click on the curve to brand a dot, and drag that dot to the top-left, half-mode the horizontal of the first square of the grid. Now, if you exam, the sparse lines are much softer, but the hard your press, the harder the castor becomes.
Source: https://docs.krita.org/en/user_manual/loading_saving_brushes.html#:~:text=The%20Brush%20settings%20drop%2Ddown,F5%20key%20to%20open%20it.
Posted by: pratherfiefultoothe.blogspot.com
0 Response to "How To Change Brush Presets In Krita"
Post a Comment